
Jenkins Tutorial: Installation, Build and Release Jobs

Article Series: Jenkins Tutorial
Part 1: Build and Release Jobs
Part 3: Implementing a Seed Job
(Sign up for the HappyCoders Newsletter
to be immediately informed about new parts.)
In this article series, you will learn about Jenkins, its major features, and the Jenkins Job DSL.
In this first part, you'll learn:
- How to install Jenkins
- How to manually configure Jenkins build and release jobs for a Maven project
- How to code Jenkins build and release jobs with the Jenkins Job DSL
- How to generate views with the Jenkins Job DSL
- How to configure Jenkins' script security system
- How to automatically update existing jobs after changing the job DSL code
- How to generate new Jenkins jobs fully automatically for new Java projects
Jenkins Installation as a Docker container with Ansible
The official Jenkins installation tutorial introduces two types of installation for Linux: Docker containers and via the package manager. The installation via the package manager is quite fast and recommended for your first experiments. I want to install Jenkins long-term and reproducibly and will, therefore, install it – analogous to my WordPress installation – as a Docker container with Ansible.
The following steps are necessary:
- Creating an Ansible role
- Creating a
docker-compose.ymlfile on the server - Starting the container on the server
You also need to make the Jenkins installation accessible; there are several ways to do this:
- Access to the container port via an SSH tunnel (easy and secure)
- Opening the server's Jenkins port (insecure)
- Creating a subdomain (e.g., jenkins.happycoders.eu) and configuring haproxy to forward accesses to that subdomain to the Jenkins container (complex)
Step 1: Creating the Ansible role
If you are not familiar with Ansible, I recommend that you read my tutorial on setting up a dedicated server with Ansible. Alternatively, you can skip this step and do steps 2 to 4 manually. The advantage of Ansible is that the steps can be executed again automatically at any time.
In my Ansible project, I create the directory roles/jenkins/ and below it, the subdirectories files/ and tasks/.
Step 2: Creating a docker-compose file on the server
From the docker run command given at https://www.jenkins.io/doc/book/installing/#on-macos-and-linux, I create the following docker-compose.yml file:
version: '3.3'

services:
  jenkins:
    ports:
      - 127.0.0.1:8080:8080
    volumes:
      - jenkins_home:/var/jenkins_home
    image: jenkins/jenkins
    restart: always

volumes:
  jenkins-data:Code language: YAML (yaml)
It is essential to specify the IP address 127.0.0.1 for the port mapping, as port 8080 would otherwise be openly accessible from the Internet (unless you want that).
Manually installing the docker-compose-file without Ansible
For manual installation, save the above file to /opt/docker/jenkins/docker-compose.yml.
Automatically installing the docker-compose-file with Ansible
To install the file with Ansible, you need to store it in the roles/jenkins/files/ subdirectory of your Ansible repository as docker-compose.yml. Then create the tasks file roles/jenkins/tasks/main.yml with the following content:
- name: Create Jenkins docker directory
  file:
    path: /opt/docker/jenkins
    state: directory
    owner: root
    group: root
    mode: 0755

- name: Copy Jenkins docker-compose file
  copy:
    src: docker-compose.yml
    dest: /opt/docker/jenkins/
    owner: root
    group: root
    mode: 0644Code language: YAML (yaml)
Now you have to add the role "jenkins" to the Ansible playbook of your server and run it. In the following screenshot, I have commented out all other roles of my server for the sake of simplicity:

Step 3: Starting the container on the server
Manually starting the container without Ansible
To start the container manually, execute the following command in the /opt/docker/jenkins/ directory:
docker-compose up -dCode language: plaintext (plaintext)Automatically starting the container with Ansible
To start the container automatically via Ansible, append the following task to the end of the main.yml:
- name: Run docker-compose up -d
  shell: docker-compose up -d
  args:
    chdir: /opt/docker/jenkins/Code language: YAML (yaml)
I'm rerunning the playbook:

On the server I check the log output of the new container:
cd /opt/docker/jenkins
docker-compose logs -fCode language: plaintext (plaintext)
The log indicates that the container has successfully been created:

The Jenkins installation is now available on port 8080 of the server, and – as desired – only on localhost, so that it is not openly accessible from the Internet. In the following step, I present three options to access the installation from outside.
Variant a: Access to the container port via an SSH tunnel
Step 4: Making the Jenkins installation accessible
The easiest and safest way to access our server is through an SSH tunnel. On the server-side, you need to set the AllowTcpForwarding yes option in the /etc/ssh/sshd_config file.
Depending on whether you are using Windows or Linux, open the tunnel as follows:
Windows:
In your Putty session, select Connection/SSH/Tunnels on the left, then enter a local port on the right (in the example: 8081) and the destination from the server's point of view (in the example: localhost:8080) and click "Add":

If you already have an SSH connection open, you need to close it and open a new one to establish the tunnel. You can then access the Jenkins installation via http://localhost:8081:

Linux:
From Linux you establish a connection via the ssh command specifying the following parameter:
-L <lokaler Port>:<Host-Name aus Sicht des Servers>:<Port des Docker Containers>Code language: plaintext (plaintext)Analogous to the Putty configuration described above, the command would be:
ssh -L 8081:localhost:8080 [email protected]Code language: plaintext (plaintext)This command creates a tunnel from my local port 8081 to port 8080 of the server ("localhost" from the server's point of view), and my Jenkins installation can be reached at http://localhost:8081 again.
Variant b: Opening the server's Jenkins port
Via the docker-compose file, we mapped the address 127.0.0.1:8080 to the docker-container on the server. If we omit the IP address 127.0.0.1 at this point, it is bound to 0.0.0.0 instead, i.e., to all IP addresses of the server, including the external ones. Since Docker automatically opens all mapped addresses in the firewall, our Jenkins would be openly accessible from the Internet. Even though Jenkins is secured by user authentication, you may not desire this. Furthermore, the connection is not encrypted.
Variant c: Creating a (sub)domain
The third option would be to create a (sub)domain, such as jenkins.happycoders.eu, combined with the configuration of a virtual host in haproxy, which forwards the incoming traffic to localhost:8080 (the Jenkins docker container). This step is time-consuming, especially the setup of an SSL certificate, which you should not omit in such a solution. With this variant, the Jenkins installation can also be accessed via the Internet, unless you configure the firewall in such a way that the IP address to which the virtual host is bound can only be accessed from specified IP addresses. This variant makes sense if you only access the server from a limited range of IP addresses, e.g., your office (assuming it has a fixed IP address).
The configuration is analogous to the configuration of the HappyCoders.eu website, which I described step by step in my Ansible tutorial on the setup of HAProxy and an HTTPS certificate from Let's Encrypt. To describe this in detail here would go beyond the scope of this article, as this article is primarily about Jenkins – not about Ansible, haproxy or Let's Encrypt.
Step 5: Completing the Installation
To complete the installation, Jenkins prompts you to enter the contents of the file /var/jenkins_home/secrets/initialAdminPassword into the displayed form. We already saw the password in the log output above and can copy it from there.
Alternatively, you can read it from the given file. The file path does not exist on the host but in the Docker container. There are two ways to display the contents of the file:
Variant 1: Reading the password file using docker exec:
Using docker exec, we can execute any command on the container, including cat, to display the contents of a file:
docker exec -it <Container ID> cat /var/jenkins_home/secrets/initialAdminPasswordCode language: plaintext (plaintext)Variant 2: Reading the password file from the mapped volume
Since we defined the directory /var/jenkins_home/ as a volume in docker-compose.yml, it is mapped to a directory on the host. We can find out which directory this is via docker inspect:
docker inspect -f '{{ .Mounts }}' <Container ID>Code language: plaintext (plaintext)The following output appears on my server:
[{volume jenkins_jenkins_home /var/lib/docker/volumes/jenkins_jenkins_home/_data /var/jenkins_home local rw true }]Thus we find the initial admin password with the following command (we have to use sudo, because the regular user has no access to the docker volume):
sudo cat /var/lib/docker/volumes/jenkins_jenkins_home/_data/secrets/initialAdminPasswordCode language: plaintext (plaintext)After entering the admin password in the web browser, you have to decide for an initial plugin selection. I choose the recommended plugins here. Next, you create the initial admin user. Later you can also connect Jenkins to an LDAP server. You can leave the Jenkins URL at http://localhost:8081/. If you later change the way you access the server, you can change the URL at any time by going to Manage Jenkins → Configure System → Jenkins Location.


Basic Configuration
Installing plugins
Now we have to install some plugins. To do this, click on Manage Jenkins → Manage Plugins in the navigation on the left and select the following plugins for installation (you can search for "authorize", "git", "groovy", "dsl", and "maven" using the filter function):
- Authorize Project (required to run Groovy code loaded from a Git repository)
- Git Parameter (enables the selection of a branch)
- Groovy (allows us to use groovy code within a job)
- Job DSL (provides the possibility to create jobs via a DSL; more about this in the second part of the article series)
- Maven Integration (provides the "Maven" job type)
Setting up Maven
The Jenkins Docker container does not yet contain a Maven installation. Fortunately, Jenkins can download and install Maven on its own. To do this, select Manage Jenkins → Global Tool Configuration from the main menu. Then scroll down to "Maven", click "Add Maven", and enter "Latest" as the name. The "Install automatically" checkbox is set by default, and the current version is displayed under Version. With a click on "Save", you save the changes.

Setting up Git
Now we have to define a username for Git commits made by Jenkins. This is done under Manage Jenkins → Configure System, in the "Git plugin" section. Here I enter "Jenkins" as user with the email address "[email protected]":

To access our Git repository via SSH, we need to create a key pair. Jenkins offers the possibility to store key pairs under credentials in the main menu. However, these key pairs can only be used for cloning repositories using the Git plugin. To push changes into the repository (which is necessary for the release job), we use the Maven goal scm:checkin. This Maven task cannot access the key pairs stored in Jenkins but uses the keys stored in the Jenkins container in the home directory of the jenkins user. These keys can also be accessed by the Git plugin so that one key pair is sufficient. We create it by calling ssh-keygen in the running Jenkins docker container:
docker exec -it <Container ID> /bin/bash -c "ssh-keygen -t ecdsa -b 521
     -C <Kommentar, z. B. 'jenkins@jenkins.<Server Name>'>
     -N ''
     -f ~/.ssh/id_ecdsa"

docker exec -it <Container ID> /bin/bash -c "cat ~/.ssh/id_ecdsa.pub"Code language: plaintext (plaintext)
On my server it looks like this:

I add the public key to my Git repository (on GitLab the URL is https://gitlab.com/profile/keys):

Manually configuring Jenkins jobs for Maven projects
Below I'll show you how to create a build job and a release job for two interdependent Maven projects. The sample Maven projects (a demo application and a demo library used by it) are located in the following git-monorepo: https://gitlab.com/SvenWoltmann/jenkins-tutorial-demo
You can read why I prefer Monorepos in my article about the advantages of Monorepos. In the appropriate places, I'll emphasize what you have to do differently to create a job for a Multirepo.
Jenkins build job
Usually, a build job runs after each commit in source code management; it loads the source code from the source code management tool, builds the project, and performs all unit and integration tests. The build job creates SNAPSHOT artifacts (such as JAR, WAR, or EAR files) and uploads them to an artifact repository (a central repository for the artifacts created, such as https://mvnrepository.com/).
I create build jobs for the two projects in the above linked Git repository as follows:
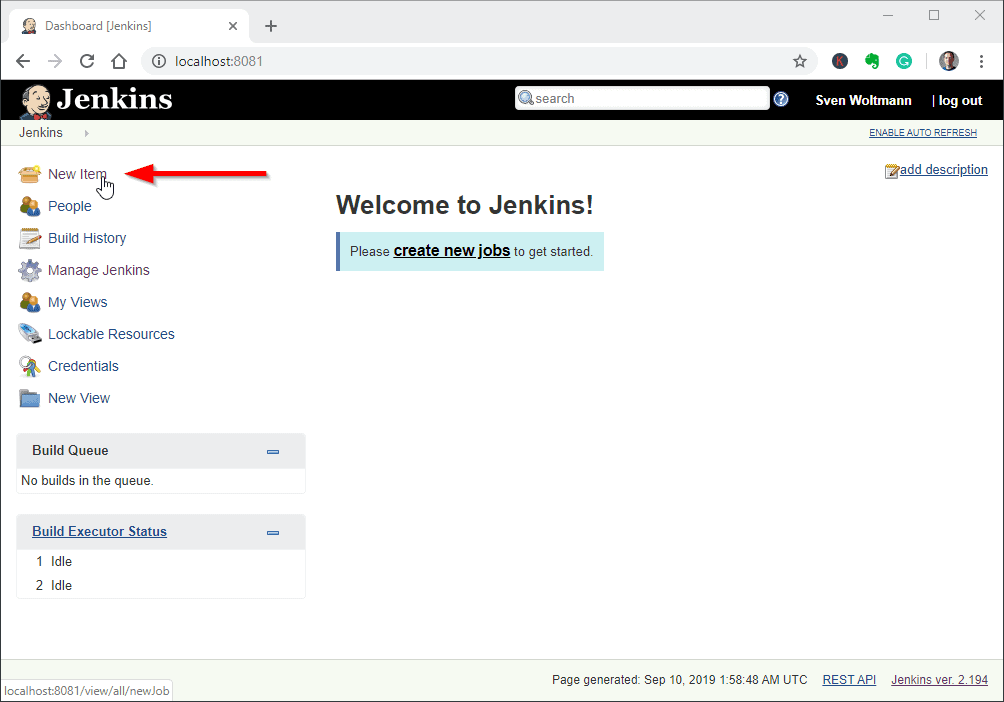
First, I click on "New Item" in the upper left corner:
On the following page, I enter a name, select "Maven project" (the Maven Integration plugin provides this option) and click "OK":

In the "General" tab, I enter a short description, activate "Discard old builds" and enter 5 as "Max # of builds to keep". Builds sometimes take up a lot of disk space, and with this setting, I cause Jenkins to keep only the last five builds.

Also on the "General" tab, I activate "This project is parameterized", click on "Add Parameter" and then on "Git Parameter":

In the new appearing field, I enter "Branch" as name, a description, as parameter type I also select "Branch", and as default, I enter "origin/master". This setting allows me to build a specific branch of the project. If I omit the previous and this step, Jenkins always builds the master branch.

I scroll down to "Source Code Management" and select "Git". As the repository URL, I store the clone URL of my repository, "[email protected]:SvenWoltmann/jenkins-tutorial-demo.git". If you don't have a GitLab account or you have problems with authentication, you can also enter the HTTPS URL "https://gitlab.com/SvenWoltmann/jenkins-tutorial-demo.git", which allows cloning without authentication.
Under "Branch Specifier", I enter "$Branch" – this will be replaced at build time by the Branch parameter defined in the previous two steps.
Since I want to check out only a subproject of my git-monorepo, I click on "Add" in "Additional Behaviours" and select "Sparse Checkout paths". (You can skip this last step on a Multirepo.)

Under "Sparse Checkout paths / Path", I enter the path of the project to be built, "library1/". I click again on "Add" and on "Polling ignored commits in certain paths". (These steps are not necessary for a Multirepo either.)

Under "Polling ignored commits in certain paths / Included Regions", I enter "library1/.*". This setting causes Jenkins to build the project automatically only if something changes in the project. Without this setting, Jenkins would always rebuild the project if something changed in any subproject of the monorepo. (You can also omit this step with a Multirepo.)

In the category "Build Triggers", you have to pay special attention to the option "Build whenever a SNAPSHOT dependency is built". This option makes sense per se, but with large dependency graphs, a small commit can trigger hundreds of build jobs. Since there are only two projects in my demo, I leave this option enabled.
I also enable the option "Poll SCM" and enter "H/15 * * * *" under "Schedule", which causes Jenkins to check every quarter of an hour in GitLab if there are new commits for the project and to rebuild the project if that is the case.

We can skip the categories "Build Environment" and "Pre Steps". Under "Build" the "Root POM" path must be adjusted. The Root POM path is "pom.xml" by default, but in our Monorepo, the pom.xml files are located in the project directories. Therefore I change the entry to "library1/pom.xml". (For a Multirepo with the pom.xml in the root directory, leave this entry unchanged.)
In "Goals and options", I enter "clean install", so Jenkins eventually builds the project by calling mvn clean install and then placing it in the local Maven repository.

After the build, we could upload the created JAR to an artifact repository, such as the Nexus Repository Manager. You would do this by clicking "Add post-build action" under "Post-build Actions", selecting "Deploy artifacts to Maven repository", and entering the repository URL.
Since I haven't installed an artifact repository and the JAR in the local Maven repository of the Jenkins server is sufficient for me, I skip this step and click "Save" to complete the configuration. We land on the page of the job I just created. To run the job, I click "Build with Parameters":

The following form appears in which we can select the Git branch. Currently, there is only the master branch, so I select it and click "Build" to continue:

The job is now running, as you can see from the progress bar in the build history at the bottom left:

After a short time, the job is finished. The progress bar disappears, and the previously gray ball turns blue. If you prefer green (and you don't have people with red-green vision loss on your team), the "Green Balls" plugin can be of assistance.

Clicking on "#1" takes you to the console output of the job:

At the end of the console output we see that the job took 7.5 seconds and was completed successfully:

Analogously you can configure the build job for the "application1" project of the monorepo.
In the following section, I'll show you how to upgrade the build job to a release job.
Jenkins release job
What is the difference between a release job and a build job? A release job is triggered manually. It sets the version number of the project to a release version (i.e., without "SNAPSHOT"), builds the project, uploads it to an artifact repository if necessary, and finally sets the version number to the next SNAPSHOT version.
First, we create the release job as a copy of the build job. We click on "New Item" in the upper left corner. As the name, I enter "Jenkins Tutorial Demo - Library 1 - Release". We don't need to select a project type – instead, we enter the name of the job we want to copy into "Copy from" at the bottom – i.e. "Jenkins Tutorial Demo - Library 1". Finally, we click on "OK".

We return to the configuration form, where I first adjust the description ("Release job" instead of "Build job"):

I scroll down to "This project is parameterized" and remove the Git parameter "Branch" via the cross in the upper right corner, because I want to create releases exclusively from the master branch.
Instead, I add two "String Parameters" via "Add Parameter":
- "releaseVersion": this sets the release version. If you leave the field empty when executing the job, the current SNAPSHOT version is used by default without the "-SNAPSHOT" suffix.
- "nextSnapshotVersion": this sets the snapshot version after the release. If you leave this field empty, the minor position of the release version is increased by one.

In the section "Source Code Management", we change the Branch Specifier to "origin/master". We had removed the "Branch" parameter in the previous step since we want to build releases from the master branch only.

In the same section under "Additional Behaviours", another action must be entered, which is "Check out to specific local branch" with the branch name "master". Otherwise, the Maven goal scm:checkin will later fail with the error message "Detecting the current branch failed: fatal: ref HEAD is not a symbolic ref".

In the section "Build Triggers", I deactivate any triggers because I want to start my release job only manually:

In the section "Pre Steps", I add one step of the type "Execute system Groovy script" via the button "Add pre-build step":
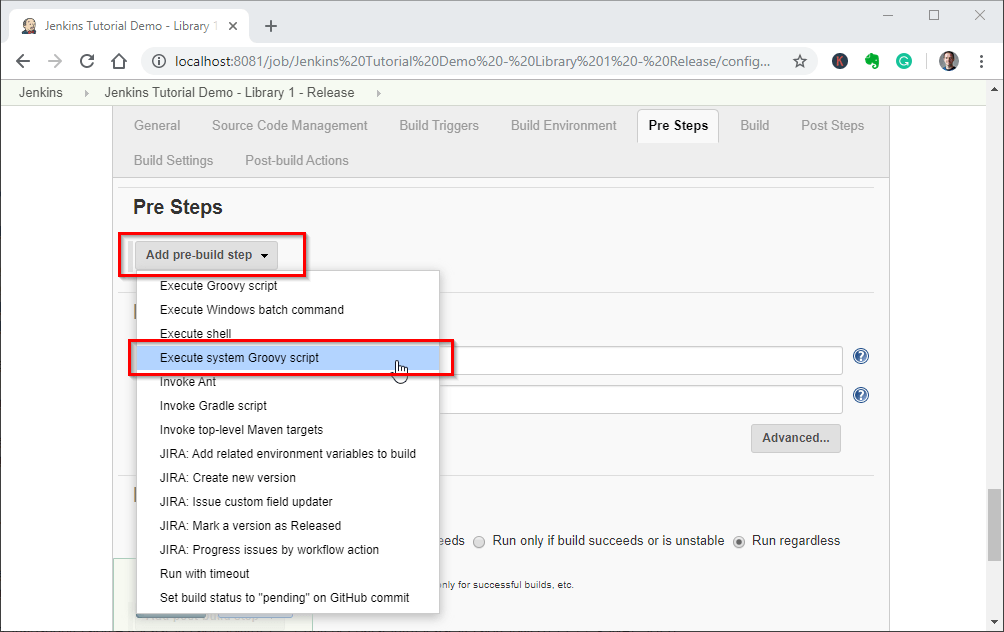
With this script, Jenkins fills the variables "releaseVersion" and "nextSnapshotVersion" if you left them empty when starting the job:

Here's the Groovy code, you can copy it if you like (make sure to adjust the pomPath for your projects):
import hudson.model.StringParameterValue
import hudson.model.ParametersAction

def env = build.getEnvironment(listener)
String releaseVersion = env.get('releaseVersion')
String nextSnapshotVersion = env.get('nextSnapshotVersion')

if (!releaseVersion) {
  String pomPath = build.workspace.toString() + '/library1/pom.xml';
  def pom = new XmlSlurper().parse(new File(pomPath))
  releaseVersion =
        pom.version.toString().replace('-SNAPSHOT', '')
  println "releaseVersion (calculated) = $releaseVersion"
  def param = new StringParameterValue('releaseVersion', releaseVersion)
  build.replaceAction(new ParametersAction(param))
}

if (!nextSnapshotVersion) {
  def tokens = releaseVersion.split('\.')
  nextSnapshotVersion =
        tokens[0] + '.' + (Integer.parseInt(tokens[1]) + 1) + '-SNAPSHOT'
  println "nextSnapshotVersion (calculated) = $nextSnapshotVersion"
  def param1 = new StringParameterValue('releaseVersion', releaseVersion)
  def param2 =
        new StringParameterValue('nextSnapshotVersion', nextSnapshotVersion)
  build.replaceAction(new ParametersAction(param1, param2))
}Code language: Groovy (groovy)
I'm adding three more pre-steps. With the first pre-step, I set the version number in the pom.xml to the desired release version. I add the pre-step as follows (releaseVersion is the variable entered as string parameter or set in the Groovy script):
- Type: "Invoke top-level Maven targets"
- Maven Version: "Latest"
- Goals:
versions:set -DnewVersion=${releaseVersion} -DgenerateBackupPoms=false - Advanced → POM: "library1/pom.xml"
The next pre-step sets all snapshot dependencies to release versions. If there is no release version of a dependency yet, the build will abort in the next step with a corresponding error message. This step ensures that the release only depends on other releases and not on snapshots:
- Type: "Invoke top-level Maven targets"
- Maven Version: "Latest"
- Goals:
versions:use-releases -DgenerateBackupPoms=false -DprocessDependencyManagement=true - Advanced → POM: "library1/pom.xml"
The last pre-step ensures that the pom.xml does not contain any references to snapshot versions. This step is necessary because the previous step does not adapt snapshot references to parent projects. If we forgot to release the parent, the build will abort at this point:
- Typ: "Execute shell"
- Command:
if find library1/ -name 'pom.xml' | xargs grep -n "SNAPSHOT"; then
   echo 'SNAPSHOT versions not allowed in a release'
   exit 1
fi
Attention: the following screenshot does not show the "POM" fields. These are located behind the "Advanced…" buttons. For the screenshot, I closed the "Advanced" fields, because they contain beside the "POM" field also several other input fields and take quite a lot of space.

We don't have to change the "Build" step. In the "Post Steps" section that follows, I select "Run only if build succeeds" at the top so that in case of a build error, the release job stops at this point. I add the following four post-steps to 1) commit the release version to Git, 2) tag it, 3) upgrade it to the next snapshot version, and 4) commit it to Git.
All four post-steps are of the same type, require the same Maven version, and work on the same pom.xml:
- Type: "Invoke top-level Maven targets"
- Maven Version: "Latest"
- Advanced → POM: "library1/pom.xml"
In the following, I list only the Maven Goals for each step:
First post-step – Committing the release version in Git (releaseVersion is the variable entered as string parameter or set in the Groovy script):
scm:checkin -Dmessage="Release version ${project.artifactId}:${releaseVersion}" -DdeveloperConnectionUrl=scm:git:[email protected]:SvenWoltmann/jenkins-tutorial-demo.gitSecond post-step – Tagging the release in Git (project.artifactId is read from pom.xml):
scm:tag -Dtag=${project.artifactId}-${releaseVersion} -DdeveloperConnectionUrl=scm:git:[email protected]:SvenWoltmann/jenkins-tutorial-demo.gitThird post-step – Incrementing the version to the next snapshot version (nextSnapshotVersion is the variable entered as string parameter or set in the Groovy script):
versions:set -DnewVersion=${nextSnapshotVersion} -DgenerateBackupPoms=falseFourth post-step – Committing the snapshot version in Git:
scm:checkin -Dmessage="Switch to next snapshot version: ${project.artifactId}:${nextSnapshotVersion}" -DdeveloperConnectionUrl=scm:git:[email protected]:SvenWoltmann/jenkins-tutorial-demo.gitAlso, in the following screenshot, I have hidden the "POM" fields for the sake of clarity:

This completes the release job; I save it with a click on "Save". I get forwarded to the job page and start the job with a click on "Build with Parameters":

On the following page, I can enter the release version and the next snapshot version. However, I leave the fields blank, trust the groovy code I wrote in step 8, and click on "Build":

While the release job is running, we can view the output by clicking on "#1" in the build history:

The release job runs successfully in just 3.2 seconds (the first build job took longer because Maven had to download its dependencies first):

To verify that the release job worked correctly, I look in the commit history of my GitLab project at https://gitlab.com/SvenWoltmann/jenkins-tutorial-demo/commits/master and see the successful release commits there:

This completes the release job, and we can configure the release job for the "application1" project in the same way.
Conclusion and outlook
In this first part of the Jenkins tutorial, I showed you how to install and initially configure Jenkins via Ansible and how to create build and release jobs for Maven projects in a git-monorepo - manually for now.
That's a pretty high manual overhead. Imagine you would have to do that for ten or 100 projects. Or, imagine you want to change a single step in the build or release process in ten or 100 projects. Not only would you be busy for hours – this manual process is also prone to errors.
Therefore in the second part of the article series, I will show you how to write the same jobs as program code using the Jenkins Job DSL and how to import them into Jenkins. In the third part, I'll show you how to write a so-called "seed job", which automatically generates new build and release jobs for new projects in the Monorepo, and adjusts existing jobs automatically when you change the job DSL code.
If this article has helped you, feel free to leave a comment and to share it via one of the share buttons at the end.
Do you want to be informed when new articles are published on HappyCoders.eu? Then click here to sign up for HappyCoders.eu newsletter.